


Who this is for: existing Sage X3 SaaS customers and the IT administrators who look after their printers.
What's involved:
- A PrinterLogic license in your company's name.
- A request we raise with Sage to switch on printing services for your Sage X3 deployment.
- Seven configuration steps in the PrinterLogic admin portal.
- A small PrinterLogic agent installed on one machine at each office that has printers.
- A print destination created in Sage X3.
Worth knowing up front: parts of this setup are still manual. As of Sage's July 2026 guidance, the PrinterLogic client on the Sage X3 Print server is installed by hand, and automatic deployment from the Sage partner portal is not yet available. We handle that part with Sage for you.
How it works
Sage X3 SaaS runs in Sage's cloud and your printers sit inside your office network. PrinterLogic connects the two, so you don't need a VPN between them.
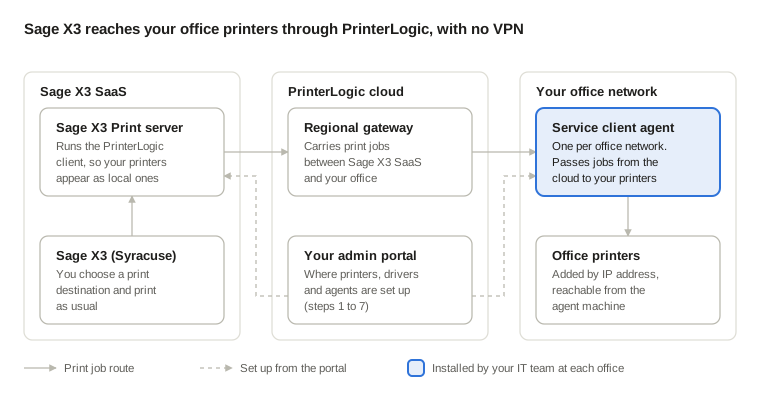
When you print from Sage X3, the job goes to your Sage X3 Print server. The PrinterLogic client there sends it through a regional PrinterLogic gateway to the service client agent in your office, which passes it to the printer. Your PrinterLogic admin portal is where you set all of this up.
Before you start
You need three things in place before any configuration begins. Missing one of them is the most common reason a setup stalls.
- A PrinterLogic license in your company's name. This covers the core license and any advanced security add-ons you choose. It also gives you your own PrinterLogic admin portal. If you want our team to configure the portal for you, you grant us access through PrinterLogic's role-based access settings.
- Sage X3 running on Sage X3 SaaS. This method applies only to Sage X3 SaaS deployments.
- Printing services switched on by Sage. We raise a request with Sage's L2 support team to configure PrinterLogic on your Sage X3 deployment. When Sage completes it, we receive:
- a unique URL for your PrinterLogic instance
- the instance or authorisation code provided by Vasion
- confirmation of the Sage X3 deployment where printing will be available.
Have this information ready:
- The name, IP address and location of every printer you want Sage X3 to use.
- At each office, one machine that can reach those printers and stays switched on during working hours. It will host the PrinterLogic service client agent.
- The printer drivers for each printer model, and a machine with Google Chrome where the PrinterLogic Chrome extension can be installed. Windows drivers must be uploaded from a Windows machine.
Who does what
|
Task |
Owner |
Notes |
|---|---|---|
|
Buy the PrinterLogic license |
You |
Held in your company's name |
|
Request printing services from Sage |
EvomatiQ |
Raised with Sage L2 support |
|
Configure the PrinterLogic portal (steps 1 to 3, 5 to 7) |
EvomatiQ or your IT team |
We need portal access if we do it |
|
Install the service client agent at each office (step 4) |
Your IT team |
Runs inside your network; we can guide you on a call |
|
Install the PrinterLogic client on the Sage X3 Print server |
EvomatiQ, with Sage |
Manual for now, done by remote desktop |
|
Create the print destination in Sage X3 |
EvomatiQ or your Sage X3 administrator |
|
|
Test print and sign-off |
Both |
One test per printer |
Set up the PrinterLogic portal
These seven steps link your office printers to Sage X3 SaaS. Do them in order: each step uses something the previous one created. Menu names appear in bold exactly as they show on screen.
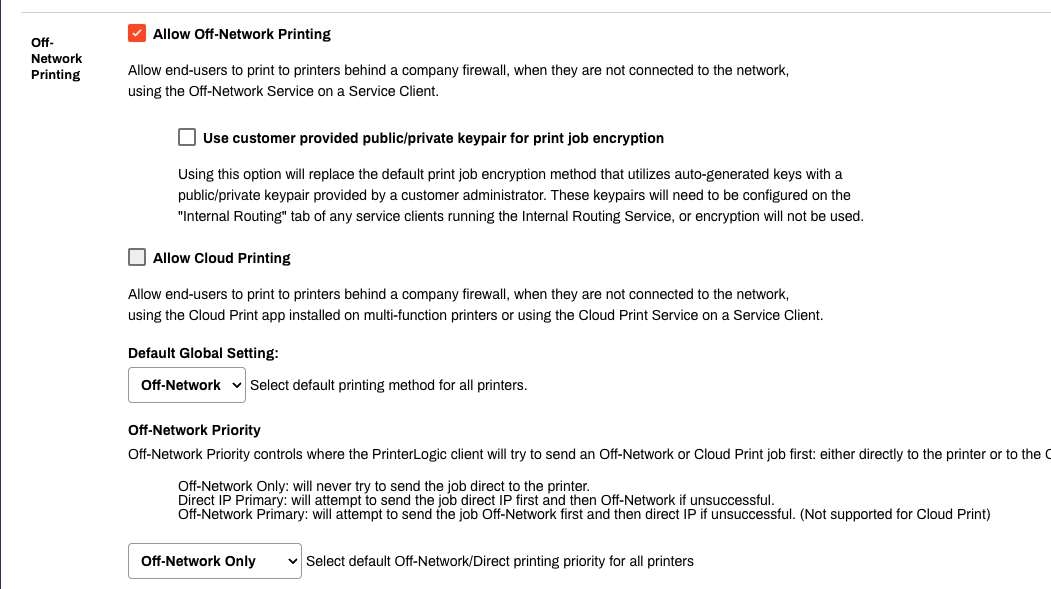
Step 1. Turn on off-network printing
This lets print jobs reach printers behind your company firewall.
- Log in to your PrinterLogic admin portal at
https://<your-instance>.printercloud5.com/admin/. Your exact address comes with Sage's confirmation. Theprintercloud5part varies by region, so use the address you were given. - Go to Tools > Settings > General.
- Tick Allow Off-Network Printing.
- Set Default Global Setting to Off-Network.
Step 2. Create a folder for each office
Folders keep your printers organised by location.
- Create a root folder, for example with your company name.
- Inside it, create one subfolder per office, for example Dubai head office or Jebel Ali warehouse.
Step 3. Generate an access code
The access code links the PrinterLogic agents to your portal.
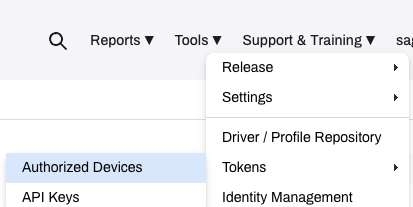
- Go to Tools > Tokens > Authorized Devices.
- Set Code Expiration length to No Expiration.
- Select Generate and save the code. You need it in step 4.
Keep this code safe. It never expires, so treat it like a password. Store it in your password manager and share it only with the people installing the agents.
Step 4. Install the service client agent at each office
The service client agent is a small application that passes print jobs from the PrinterLogic cloud to your printers. Install it on a machine that can reach the printers at that office. If you have two offices on separate networks, install one agent at each.
- In the portal, go to Tools > Settings > Client.
- Scroll to Deployable Client Packages and download the package for the machine's operating system.
- Run the installer by hand, or from a command prompt:
msiexec /i PrinterInstallerClient.msi /qn HOMEURL=https://<your-portal-address> AUTHORIZATION_CODE=<your-access-code>Replace <your-portal-address> with your PrinterLogic portal address and <your-access-code> with the code from step 3.
Step 5. Register the agent in the portal
- Select Print in the left menu and open the office folder.
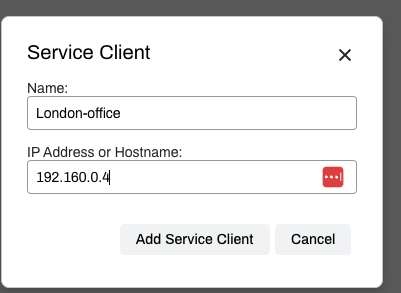
- Select New > Service Client.
- Enter a name and the IP address or hostname of the machine from step 4. Select Add Service Client.
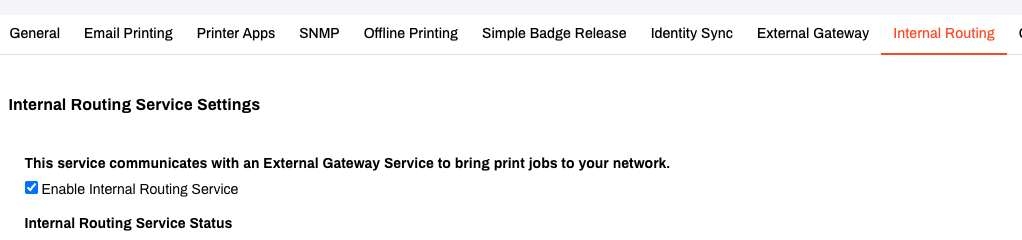
- Open the new service client, go to the Internal Routing tab and tick Enable Internal Routing Service.
-
Refresh the agent in either of two ways: select Refresh configuration from the PrinterLogic icon in the machine's system tray, or select Reauthorize on the service client's General tab.
Within a few seconds the status on the Internal Routing tab should change to online.
Optional: tick Enable SNMP Service on the SNMP tab to see each printer's queue in its Status tab. You can enable SNMP on one service client only.
Step 6. Create the auto-deployment group for Sage X3
This step makes sure every Sage X3 Print server Sage creates for you picks up your printers automatically, without anyone repeating the setup.
- Select Print in the left menu and go to your root folder.
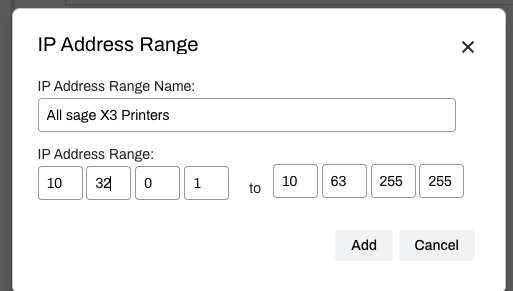
- Select New > IP Address Range.
- Name it All Sage X3 Printers and enter the range 10.32.0.1 to 10.63.255.255. Select Add.
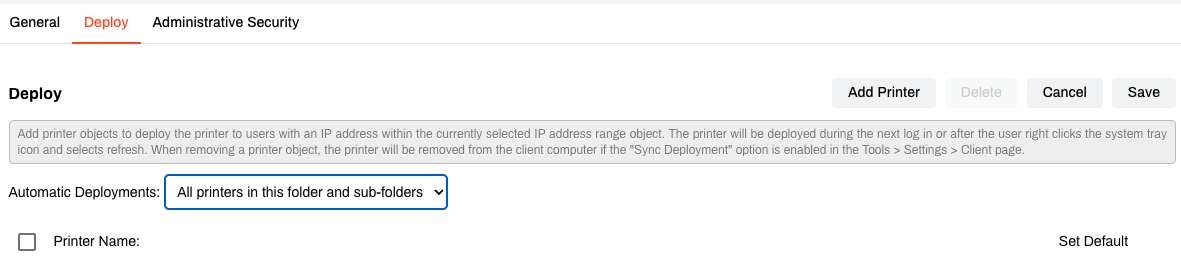
- On the Deploy tab, set Automatic Deployments to All printers in this folder and sub-folders. Select Save.
Use this IP range exactly as shown. Sage specifies it for its Print servers. It is not your office network range, so do not change it.
Step 7. Add your printers
Repeat this step for each printer.
- Select Print in the left menu and open the office folder.
- Select New > TCP/IP Printer.
- Enter the printer name, its IP address and its location. The IP address must be reachable from that office's service client agent.
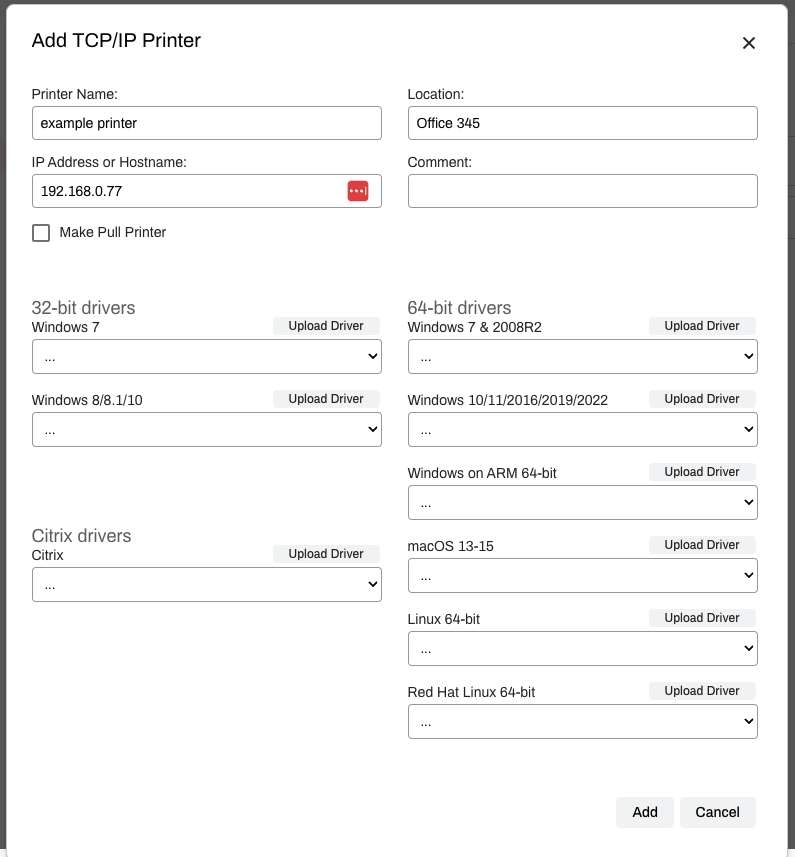
- Upload the printer drivers. You need the PrinterLogic Chrome extension installed and connected to your portal. Upload Windows drivers from a Windows machine, and drivers for other systems from a machine running that system.
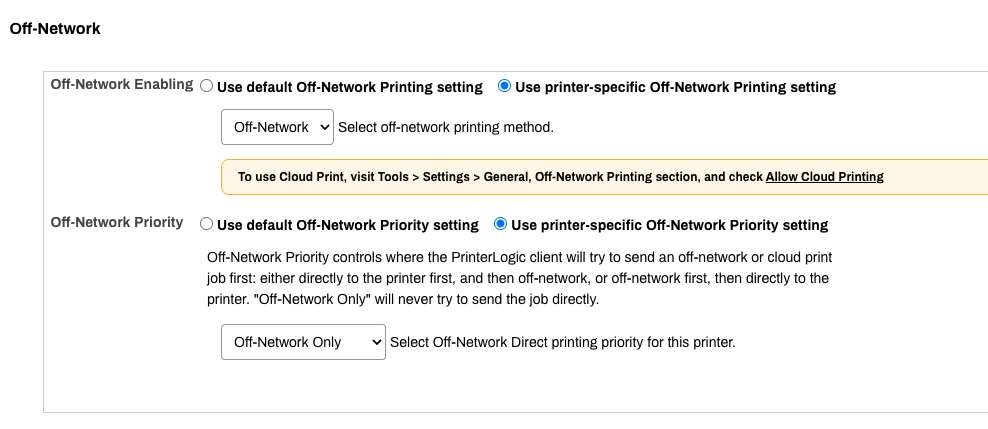
- Save the printer. On the Printer Detail page, open the Off-Network tab:
- Under Off-Network Enabling, choose Use printer-specific Off-Network Printing setting and select Off-Network.
- Under Off-Network Priority, choose Use printer-specific Off-Network Priority setting and select Off-Network Only.
-
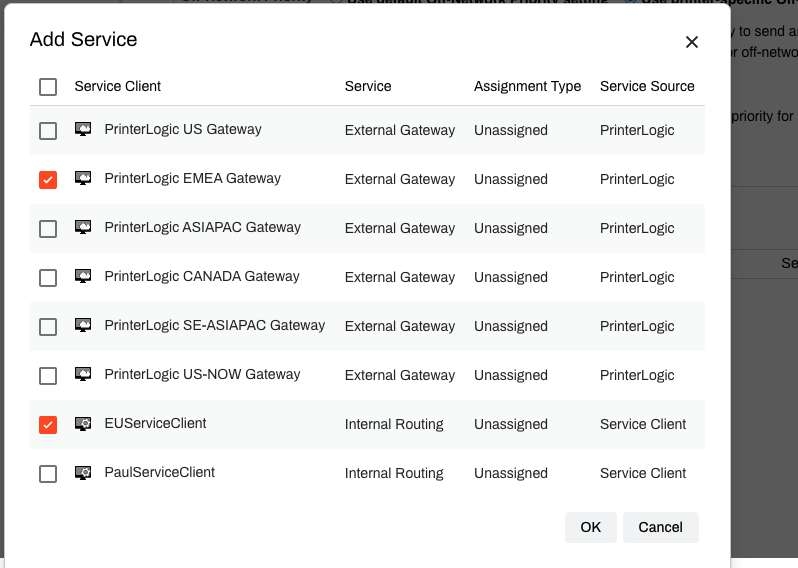
On the same tab, select Add and tick two items: the gateway for your office's region, and the service client that can reach this printer. We confirm the right gateway for GCC offices during setup.
-
Select Test to check that both the gateway and the service client are connected.
Finish the setup in Sage X3
Two things remain: connecting your Sage X3 Print server to the portal, which we handle with Sage, and telling Sage X3 which printer to use.
Connect the Sage X3 Print server (we do this)
The PrinterLogic client must also run on the Sage X3 Print server that Sage hosts for you. For now this is a manual install over remote desktop, using the same command as step 4 with your portal address and access code. Automatic deployment from the Sage partner portal is not yet available, so we arrange it with Sage Support.
What we need from you: your PrinterLogic portal address and the access code from step 3, shared through a secure channel rather than plain email.
Create a print destination
Once we confirm the Print server is connected, create a print destination in Sage X3 for each printer.
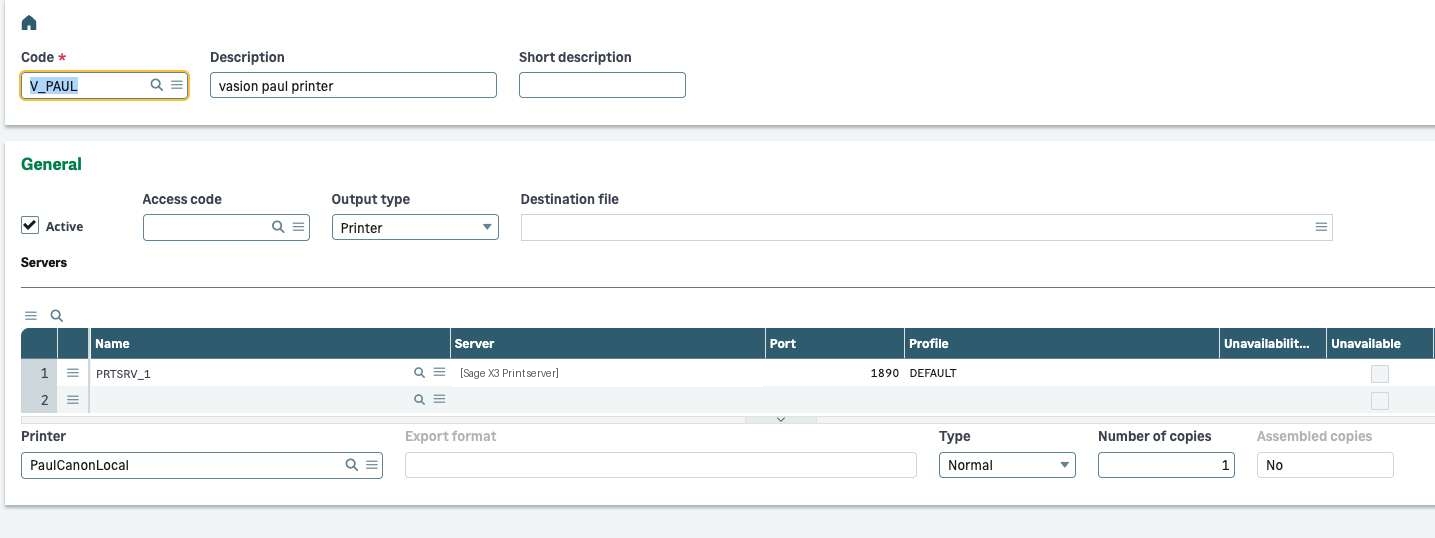
- Open the print destinations function in Sage X3.
- Enter a Code and Description, for example DXB-WH-01 and Jebel Ali warehouse printer.
- Tick Active and set Output type to Printer.
- In the Servers grid, check that your Sage X3 Print server is listed. Use the lookup to add it if not.
- In the Printer field, use the lookup and choose the printer you added in step 7. Sage X3 lists it as if it were connected directly to the Print server.
- Save, then print a test document to that destination.
If something doesn't print
Most problems trace back to one link in the chain being offline. Work through these checks before contacting us.
|
What you see |
What to check |
|---|---|
|
The printer is missing from the Sage X3 lookup |
In the portal, go to Report > Workstation. Sage X3 Print servers show a username containing |
|
The service client shows offline |
On the agent machine, select Refresh configuration from the system tray, or select Reauthorize on the service client's General tab. Confirm Enable Internal Routing Service is still ticked. |
|
The Test button on the printer's Off-Network tab fails |
Check that the right gateway and service client are both ticked, and that the printer's IP address is reachable from the agent machine. |
|
Jobs leave Sage X3 but nothing prints |
Check the printer's Status tab on its Printer Detail page (needs SNMP, see step 5). |
|
You need more detail |
Open the logs in the service client installation folder on the agent machine. They show the status of the PrinterLogic client and the off-network service. |
Still stuck? Contact us with the printer name, the office, and what the checks above showed.
Good to know
This setup works well once it is in place, but it has limits you should plan around.
- Sage X3 SaaS only. This method does not apply to on-premises or other hosted Sage X3 deployments.
- PrinterLogic is a separate product. It is licensed from Vasion in your company's name and is not included in your Sage X3 subscription.
- The agent machines matter. Printing at an office depends on its service client agent machine being switched on and connected.
- Part of the setup is still manual. Installing the client on the Sage X3 Print server is done by hand for now. Sage has indicated automatic deployment is not yet available from the partner portal. We will update this article if that changes.
Need help? We can run the whole setup for you, or sit alongside your IT team while they do it. Get in touch with us hello@evomatiq.com.
